Illustrated X.509 Certificate
Introduction
This article explains X.509 certificate.
1. Digital Signature (Prior Knowledge)
To read this article, knowledge about digital signature is needed. That is, this article assumes that you understand “By verifying signature with the public key which is paired with the private key used to generate the signature, you can confirm that the target data has been surely signed by the owner of the private key and has not been altered in transit.”
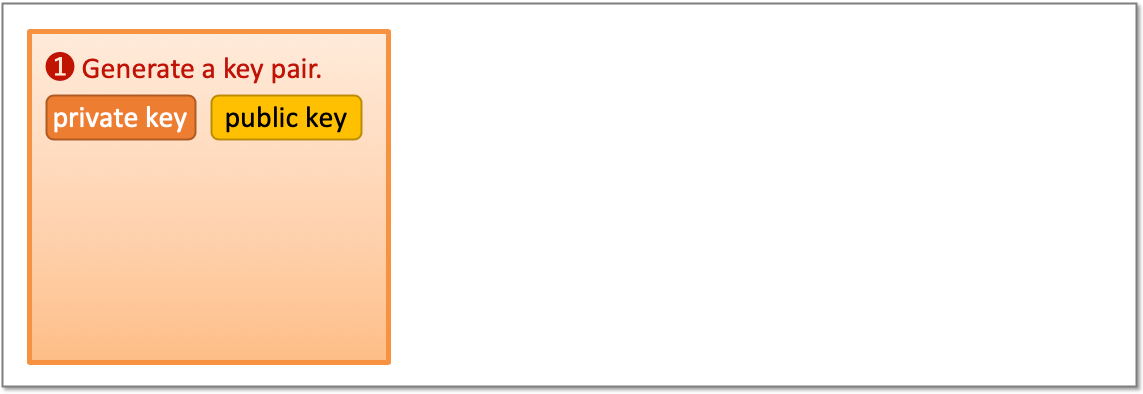
In other words, this article assumes that you know the flow illustrated below.
(1) Generate a pair of private key and public key.
(2) Pass the public key to the other party in some way or other.

(3) Prepare data to send.

(4) Generate signature for the data with the private key.

(5) Send the data and the signature together.

(6) Verify the signature with the public key.

2. Certificate Chain
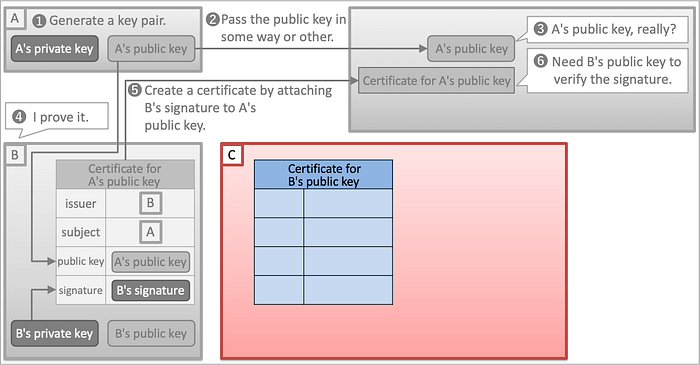
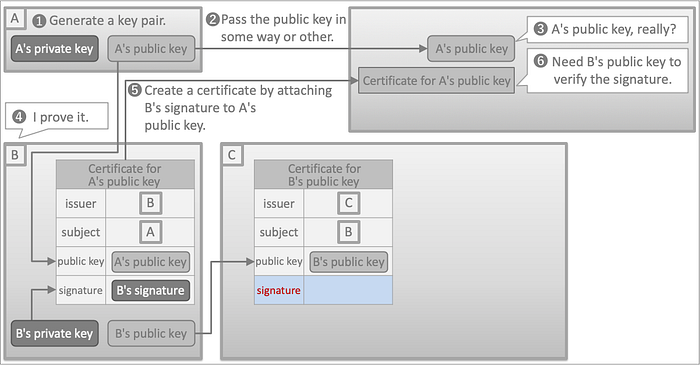
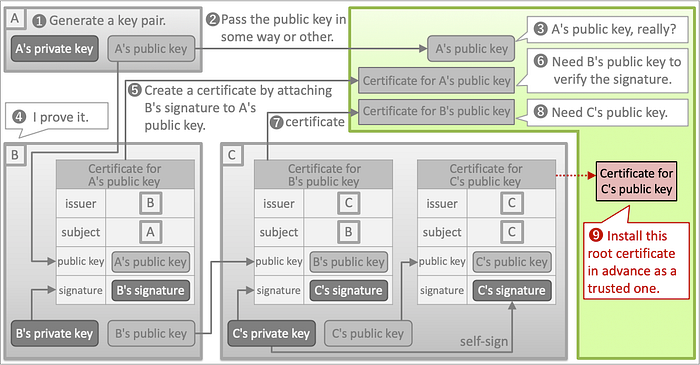
The first step to utilize public-key cryptography is to generate a pair of private key and public key.

The public key needs to be passed to the other party in some way or other.

It depends on how the public key has been passed, but what if the other party cannot be sure that the public key is the legitimate one?

A third party may say she can prove it.
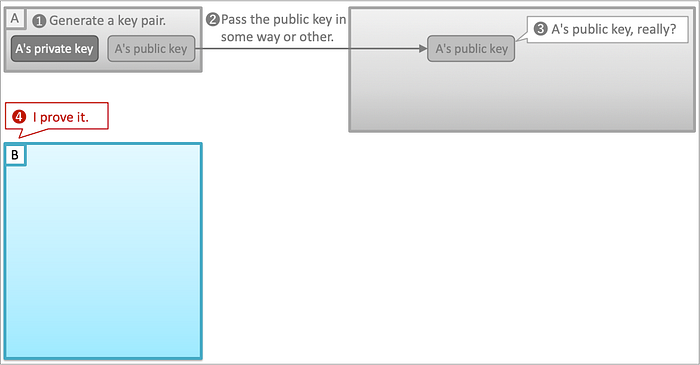
She starts to prepare a document which proves the authenticity of the public key, namely, a certificate for the public key.
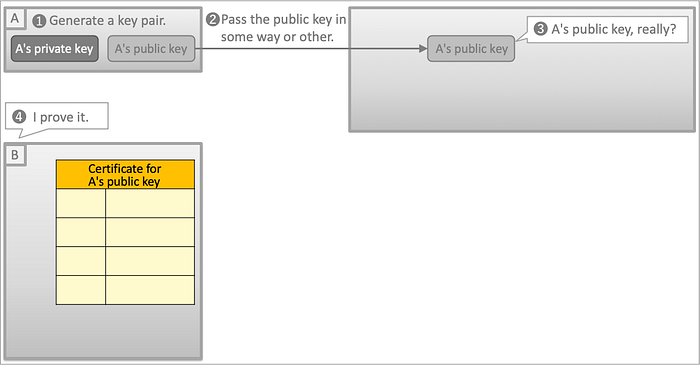
To begin with, the public key, which is the target of assurance, is put on the certificate.

Next, information about the party that has the private key (hereinafter, subject) is put.

Then, information about the issuer of the certificate (herself) is put.

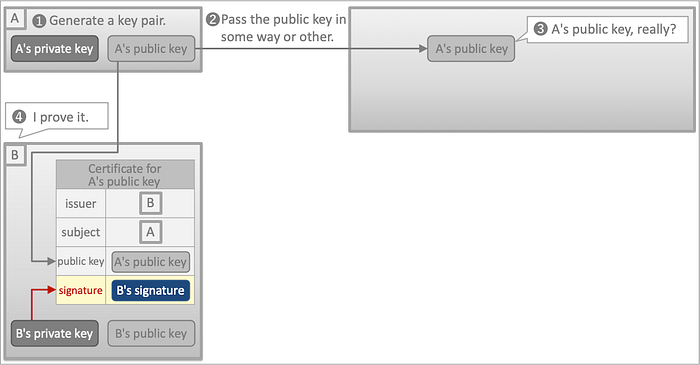
Finally, she wants to attach digital signature in order to assure the content of the certificate.
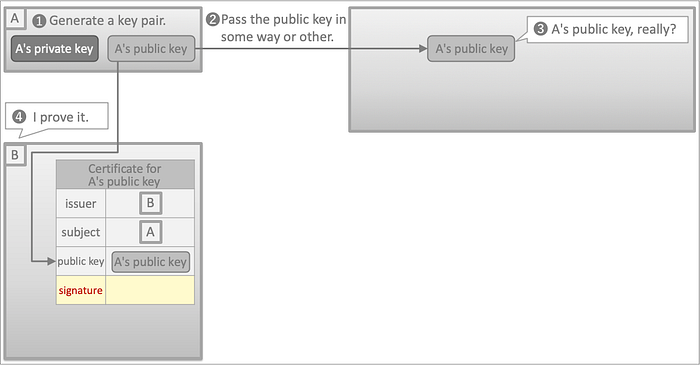
For digital signature, she generates a pair of private key and public key.
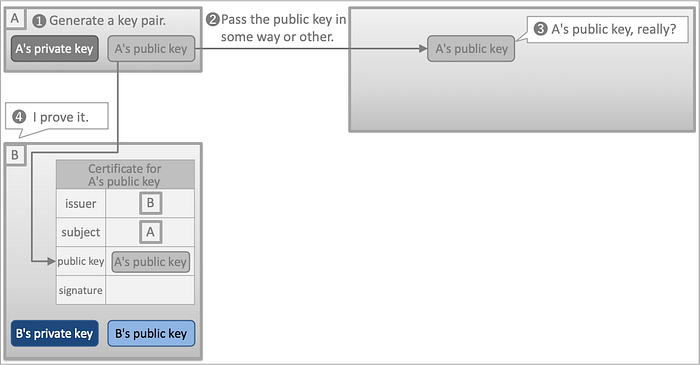
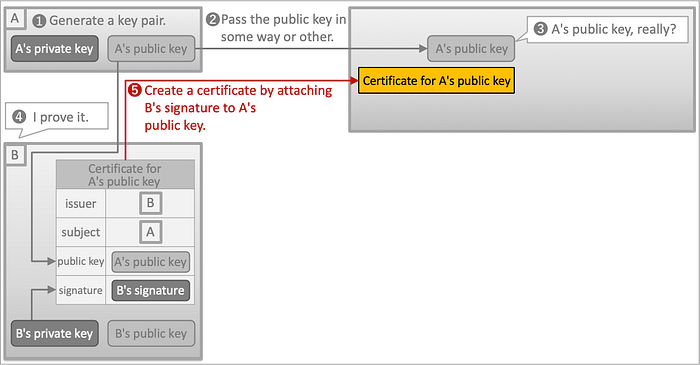
Then, she signs the certificate with the private key. This makes the certificate complete.
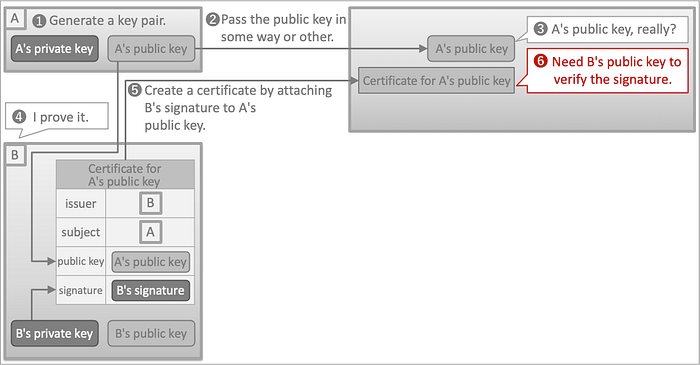
Instead of receiving the public key directly, the other party receives the certificate that includes the public key and assures the origin of the public key.
As a result, the other party could get the public key he originally wanted (“A’s public key” in the diagram). However, he realizes that he needs one more public key to verify the digital signature of the certificate (“B’s public key” in the diagram).
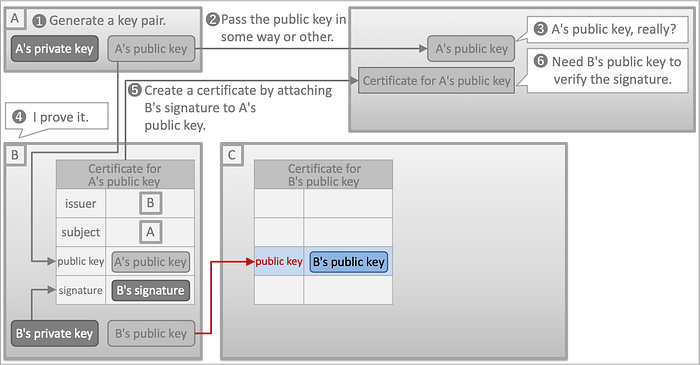
Another third party shows up and says that she provides a certificate for the public key which is necessary to verify the digital signature. She starts to prepare the certificate.
To begin with, the public key, which is the target of assurance, is put on the certificate.
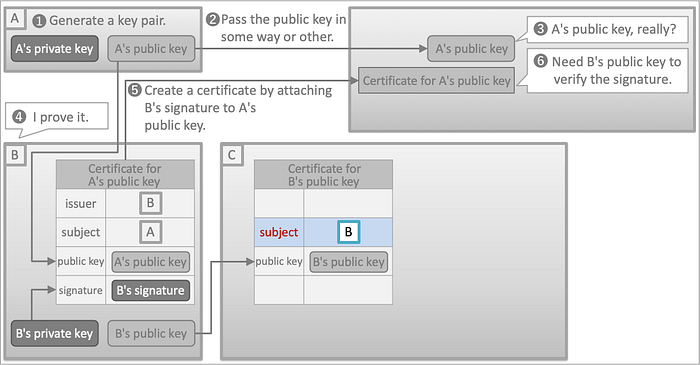
Next, information about the subject is put.
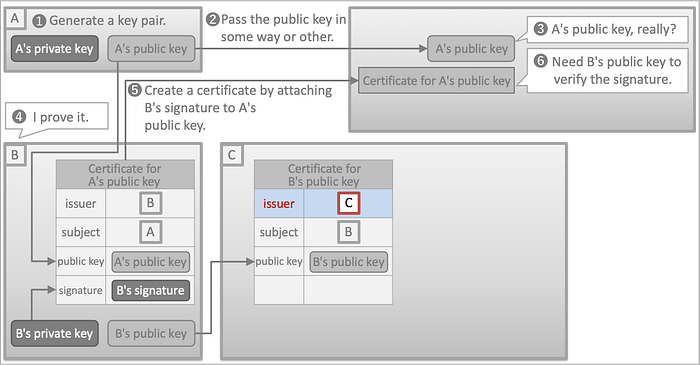
Then, information about the issuer of the certificate (herself) is put.
Finally, she wants to attach digital signature in order to assure the content of the certificate.
For digital signature, she generates a pair of private key and public key.
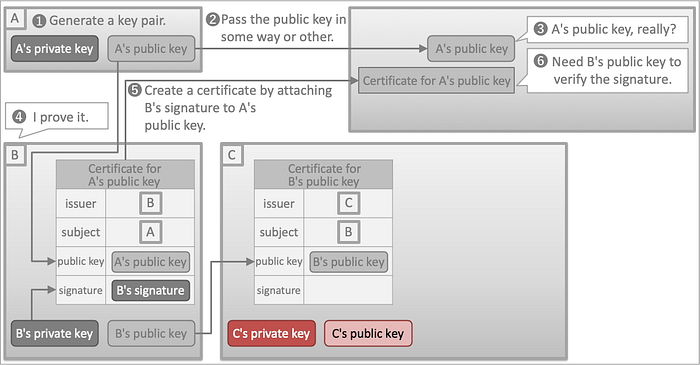
Then, she signs the certificate with the private key. This makes the certificate complete.
The complete certificate is sent to the other party.
However, here we encounter the same problem as we saw previously. The other party needs one more public key (“C’s public key” in the diagram) to verify the digital signature of the certificate he just received.

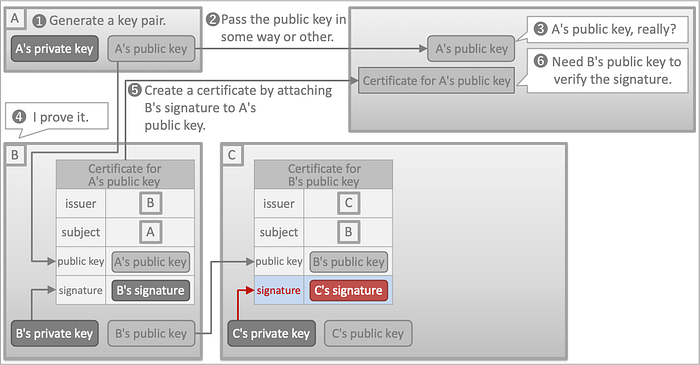
It sounds like endless, but this time, the subject of the public key herself (“C” in the diagram) says that she provides a certificate for the public key and starts to prepare the certificate.
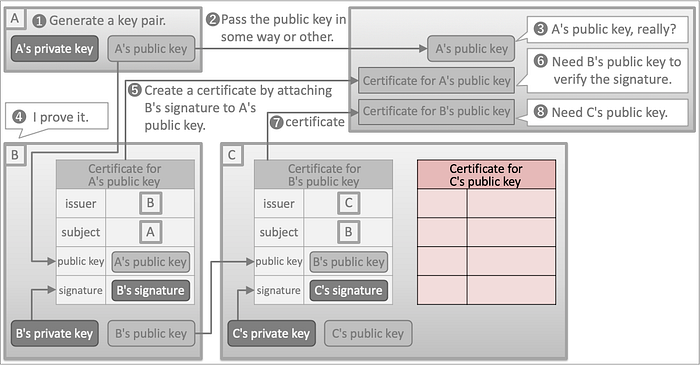
The target public key is put on the certificate,
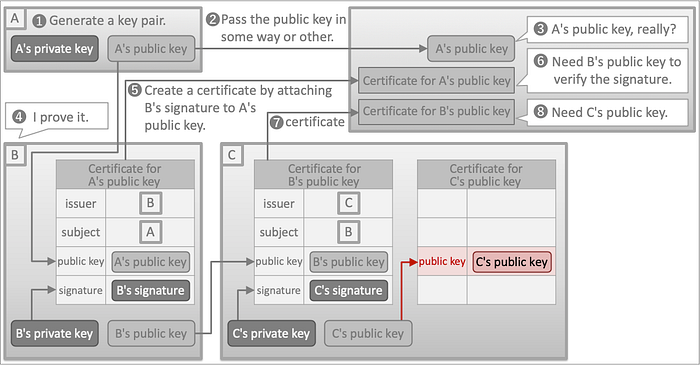
then information about the subject,
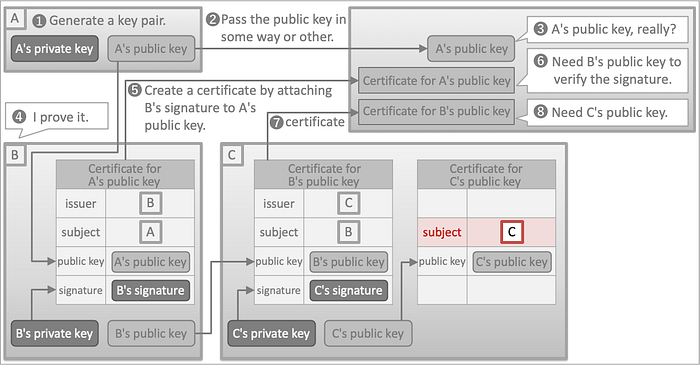
and information about the issuer (herself).

The final step is to sign the certificate. The point is that the private key used for the digital signature is the one that is paired with the target public key. The operation of signing the public key with the paired private key like this is called “self-sign”. And, a certificate made by self-signing is called “self-signed certificate”. The issuer and the subject of a self-signed certificate are identical.
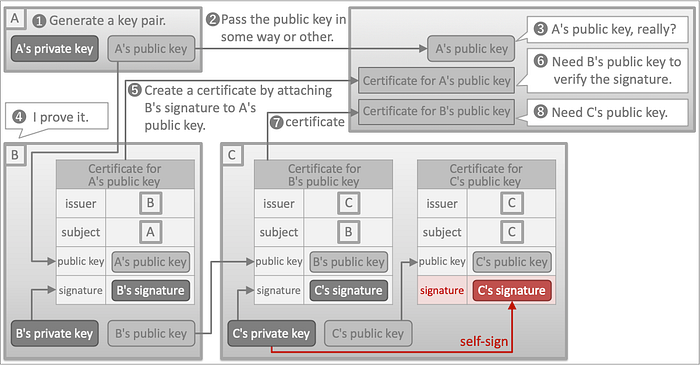
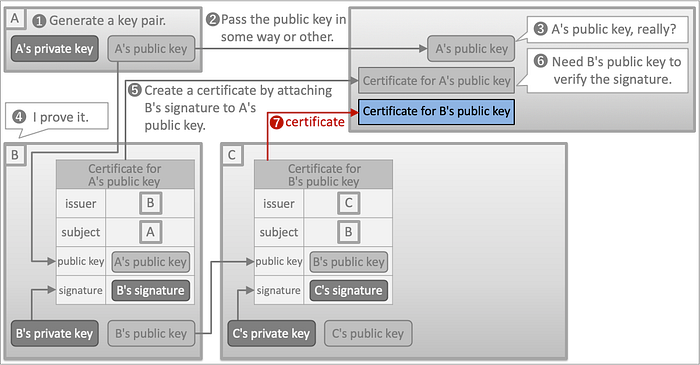
As the self-signed certificate is the origin, it has to be installed in advance as a trusted certificate.
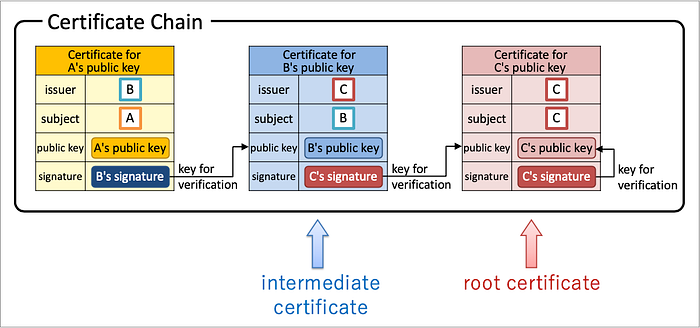
The following is the entire diagram.
If we focus on certificates in the entire diagram,

we find that certificates are connected like a chain. This chain is called “certificate chain”.

The self-signed certificate which is the origin of the chain is called “root certificate”, and the in-between certificate is called “intermediate certificate”. The number of intermediate certificates can be 2 or more.
3. Certificate Structure
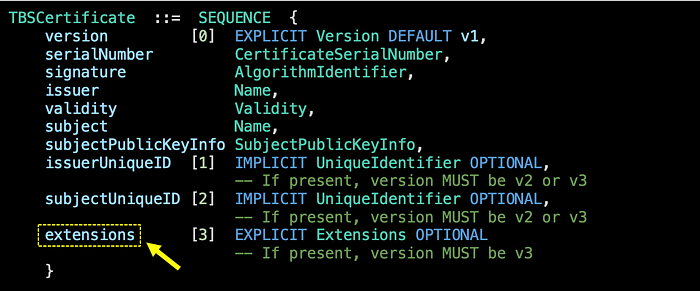
The structure of certificates is defined in RFC 5280: Internet X.509 Public Key Infrastructure Certificate and Certificate Revocation List (CRL) Profile.
The following is a part of the certificate structure excerpted from Section 4.1 of RFC 5280.
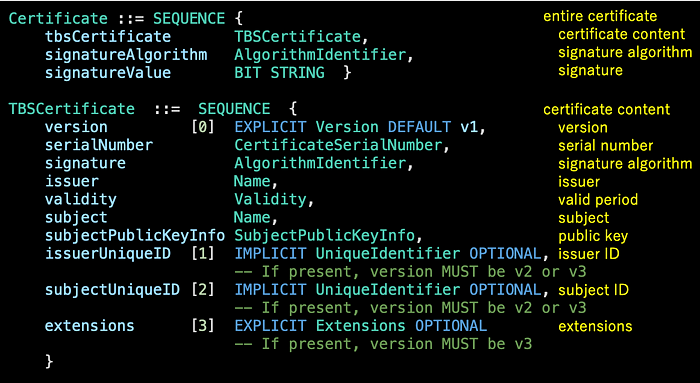
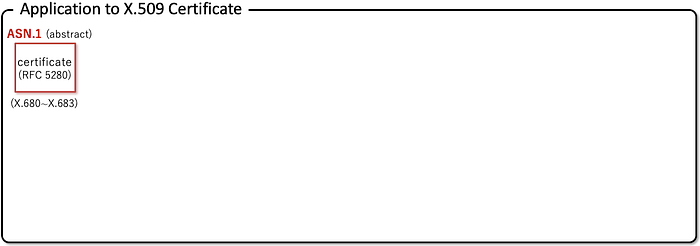
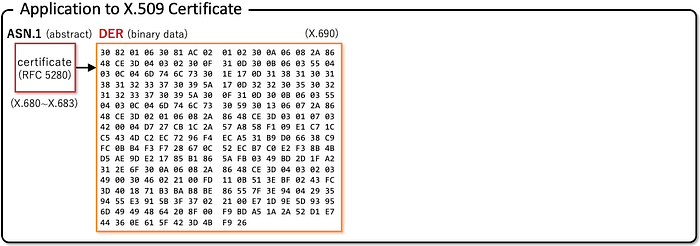
This structure definition is written in ASN.1 (Abstract Syntax Notation One). Specifications related to the notation are defined in the X.680 series.
ASN.1 is a notation to represent data structures in an abstract way and it does not define how to embody abstract structures into a specific byte sequence.

Therefore, another different specification is necessary to build a byte sequence from a data structure represented in ASN.1. For the purpose, there already exist many specifications such as DER (Distinguished Encoding Rules), XER (XML Encoding Rules), JER (JSON Encoding Rules) and so on.

After building a byte sequence, the format of the byte sequence may be changed. For example, because a byte sequence made based on DER becomes binary data, BASE64 (RFC 4648) may be applied to convert the binary data into text data.

In some cases, data may be decorated. For example, it is possible to add information about what BASE64 data represents by using the rule called PEM (RFC 7468). For example, information telling that BASE64 data represents an X.509 certificate can be added.

Let’s apply ASN.1, DER, BASE64 and PEM mentioned above to the case of X.509 certificate.
To begin with, prepare information that a certificate should have (e.g. information about the subject). Fields that a certificate should/may have are described in RFC 5280 in the form of ASN.1.
Next, convert the information into a byte sequence using DER. The generated output becomes binary data.
Convert the binary data into text data using BASE64.

Add information by using the rule of PEM. In this example, -----BEGIN CERTIFICATE----- and -----END CERTIFICATE----- are placed at the top and the bottom respectively as the BASE64 represents a certificate.

3.1. Subject
Let’s pick up the subject field from among the fields contained in a certificate to learn the data structure.
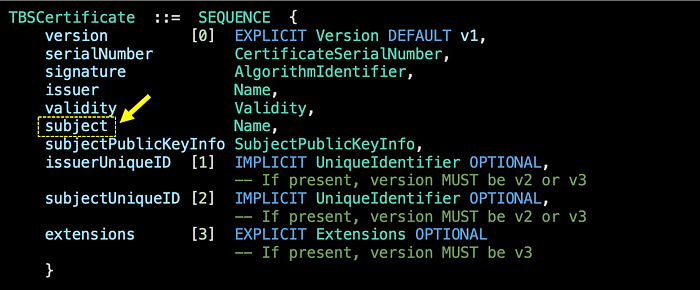
The subject field contains the distinguished name of the entity that is associated with the public key. The way to represent a distinguished name as a string is defined in RFC 4514: Lightweight Directory Access Protocol (LDAP): String Representation of Distinguished Names.
The following are examples of distinguished names listed in the specification.
UID=jsmith,DC=example,DC=netOU=Sales+CN=J. Smith,DC=example,DC=netCN=James \"Jim\" Smith\, III,DC=example,DC=netCN=Before\0dAfter,DC=example,DC=net
A distinguished name consists of attributes. UID, OU and CN in the examples above are attribute names.
An important usage of the subject field to note is that traditionally a certificate for a website contains the hostname of the server as the value of the CN (common name) attribute of the subject distinguished name.
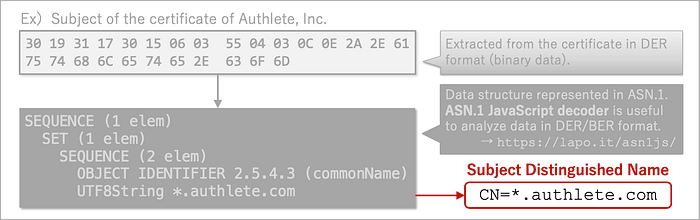
Let’s see an example. The following is the byte sequence representing the subject field of the certificate for the website of Authlete, Inc.

Decoding the binary data with ASN.1 JavaScript decoder shows the data structure below.
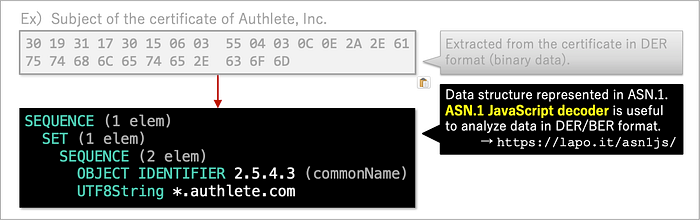
The output indicates that the subject field holds a distinguished name whose value is CN=*.authlete.com.
3.2. Subject Alternative Name
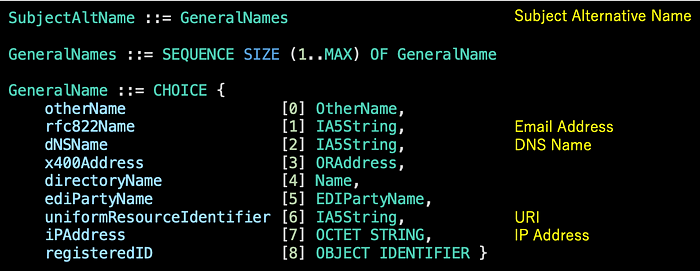
The traditional way that uses the CN attribute of the subject field cannot use other identifiers than the hostname. Also, there is no agreed rule whereby to include multiple subjects. Here the Subject Alternative Name (SAN) extension comes in.
A certificate has a place to hold extended data at.
By putting a SAN extension here, multiple subjects can be specified and other identifiers than the hostname can be used. The SAN extension is defined in Section 4.2.1.6 of RFC 5280 as below.
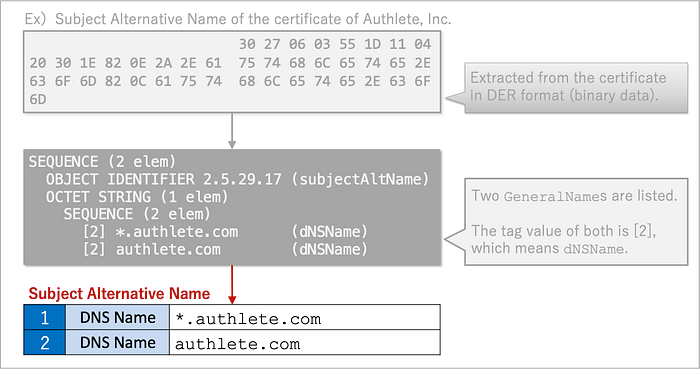
Let’s see an example. The following is the byte sequence representing the SAN extension of the certificate for the website of Authlete, Inc.

Decoding the binary data with ASN.1 JavaScript decoder shows the data structure below.
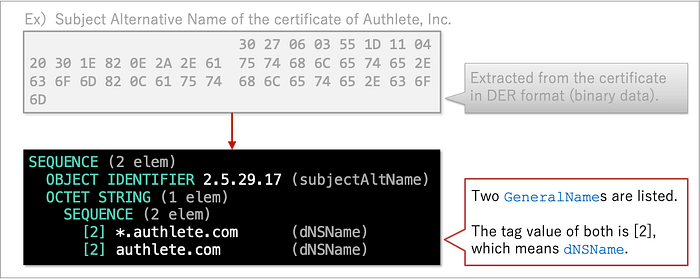
The output indicates that the SAN extension includes two DNS names, *.authlete.com and authlete.com.
4. Self-Signed Certificate
Let’s deepen the knowledge by generating a self-signed certificate.
4.1. openssl Command
To begin with, check the version of the openssl command.

As Mac uses LibreSSL instead of OpenSSL since macOS High Sierra, the default openssl command on Mac will show LibreSSL ?.?.? as shown above.
LibreSSL’s openssl command does not support new command line options added to OpenSSL’s openssl command, so install OpenSSL before you try to type commands shown in the sebsequent sections.

4.2. Private Key Generation
Let’s generate a private key.

genpkey: generates a private key. Theopensslcommand providesgenrsaandgendsasubcommands to generate RSA/DSA private keys, but they are superseded bygenpkey.-algorithm EC: uses Elliptic Curve algorithm. Note that the-algorithmoption must appear before-pkeyoptoptions when used.-pkeyopt ec_paramgen_curve:P-256: uses the P-256 curve which is a parameter specific to Elliptic Curve algorithm. P-256 is one of the curves recommended by NIST (National Institute of Standards and Technology). Refer to “D.2.3. Curve P-256” in Digital Signature Standard (DSS) if you are interested.
The command above will generate a file (private_key.pem) whose content looks like below. The format of the file is PEM. To indicate that the BASE64 part represents a private key, the file has -----BEGIN PRIVATE KEY----- and -----END PRIVATE KEY----- at the top and the bottom, respectively.

4.3. Private Key Content
Let’s confirm the content of the generated private key.
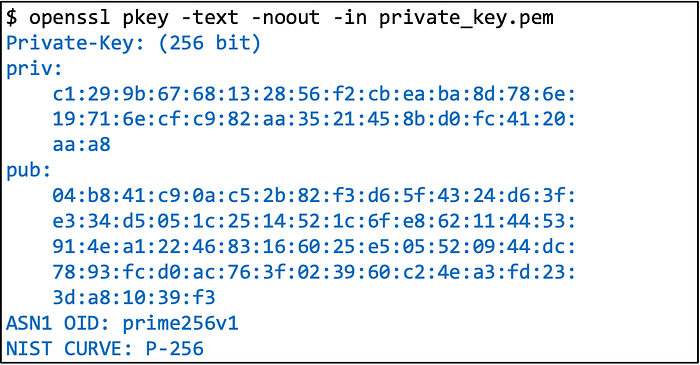
pkey: is the subcommand for key operations.-text: displays information in plain text.-noout: suppresses the encoded output.-in private_key.pem: specifies the input file.
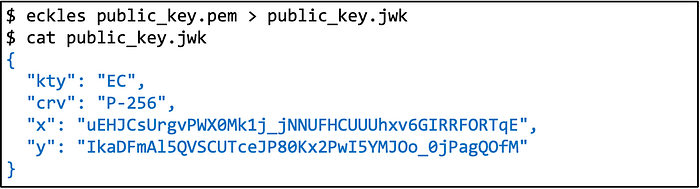
The output above implies that the private key includes the paired public key (you can find pub in the output). Converting the format of the key from PEM to JWK (RFC 7517) will show the fact more clearly. Here I use eckles for conversion.
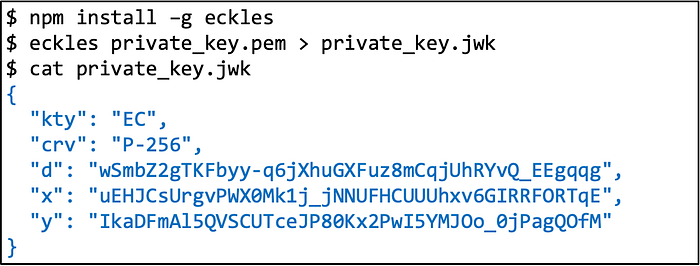
The d, x and y in the JSON are parameters specific to Elliptic Curve algorithm. The d parameter is included only in the private key while the x and y parameters are included in both the private and public keys. Removing the d parameter from the JWK will change the private key to the paired public key.
If you extract the public key from the private key in PEM format,
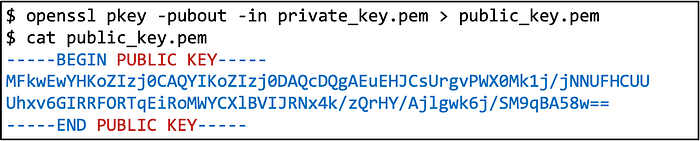
and convert the format of the public key from PEM to JWK,
you can confirm that the public key does not contain the d parameter.
4.4. Certificate Generation
Let’s generate a self-signed certificate.

req -x509: generates a self-signed X.509 certificate. The primary usage of thereqsubcommand is to generate CSR (Certificate Signing Request), but the subcommand generates a self-signed certificate instead of CSR when the-x509option is given.-key private_key.pem: specifies the private key for signing and the target public key.-subj /CN=client.example.com: specifies a subject distinguished name. If the-subjoption is not given, theopensslcommand shows a prompt for you to input a subject distinguished name interactively.- If no valid period is given, 30 days is used as the default value. The
-daysoption can be used to specify a valid period in days.
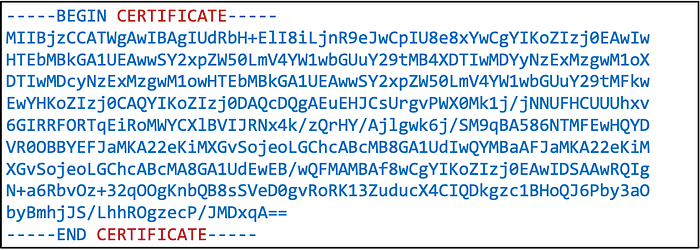
The command above will generate a file (certificate.pem) whose content looks like below. The format of the file is PEM. To indicate that the BASE64 part represents a certificate, the file has -----BEGIN CERTIFICATE----- and -----END CERTIFICATE----- at the top and the bottom, respectively.
4.5. Certificate Content
Let’s confirm the content of the generated certificate.
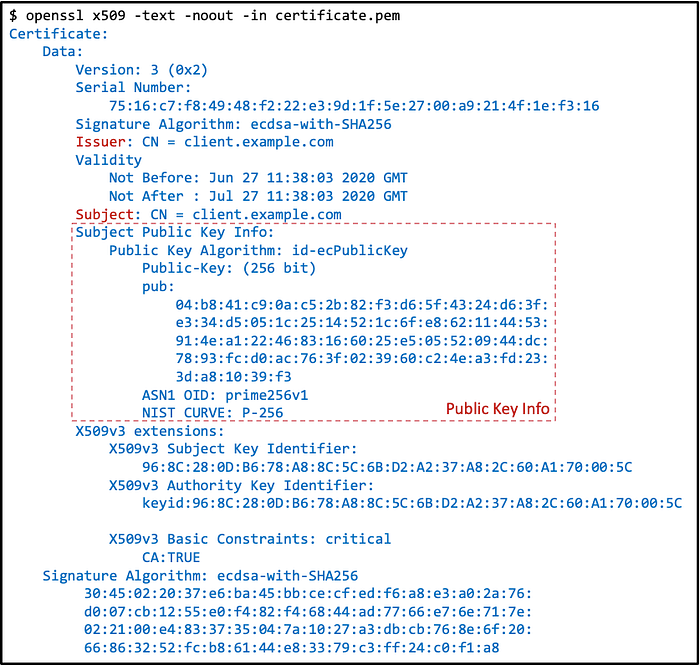
x509: is the subcommand for X.509 certificate operations.-text: displays information in plain text.-noout: suppresses the encoded output.-in certificate.pem: specifies the input file.
Note that the issuer and the subject are identical because the input certificate is self-signed. Information about the target public key is included in the Subject Public Key Info block.
Finally
The well-known usage of X.509 certificates is TLS (Transport Layer Security), but X.509 certificates are used in other various places. For example, in the OAuth world, RFC 8705 defines methods to utilize X.509 certificates for client authentication and certificate-bound access tokens. Please visit “OAuth 2.0 Client Authentication” and “OAuth Access Token Implementation” for further technical details.
I hope this article could help you understand the basics of X.509 certificates. Finally, I highly recommend “Bulletproof SSL and TLS” (by Ivan Ristić) for deeper dive.
Thank you for reading.